How the game manages multiple objects all stacked on the same tile
One of the most important gameplay aspects of The Sentinel is the ability to stack objects. Stacking boulders and robots is the only way for the player to move to higher altitudes, so it's absolutely fundamental to the goal of being able to peer down onto the top of the Sentinel's platform. Without object stacking there would simply be no game.
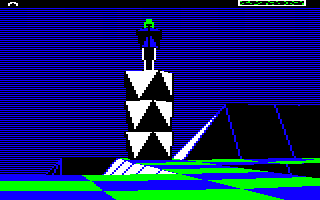
Here's a typical stack of objects, in this case consisting of three boulders with a robot on top:
There are two ways in which object stacks can appear in-game:
- The player can create stacks consisting of one or more boulders, optionally topped by a robot. The player can only create boulders or robots in stacks, but if the top object is drained of energy, it can turn into a tree.
- The Sentinel's tower starts the game as the bottom object in a two-object stack with the Sentinel on top. The aim of the game is to absorb the Sentinel and replace the top object on the stack with a robot, into which the player can transfer.
This article looks at how object stacks are structured, and how some of the key routines operate on those stacks.
Building an object stack
------------------------
Object stacks in The Sentinel are effectively implemented as linked lists (if 6502 assembly language can be said to have such sophisticated structures). The links in these lists only point one way, from the top object to the bottom, like this:
- If the tileData entry for a specific tile has bits 6 and 7 set, then this indicates that the tile contains an object (see the deep dive on tile data for details). The number of this object is in bits 0 to 5, and if there is a stack of objects on the tile, this is the object number of the top object. Let's call this Object #A; in the above example, this is the robot on top of the stack.
- If Object #A is on top of another object, then bit 6 of the objectFlags for Object #A will be set, and the number of the object beneath Object #A will be in bits 0 to 5 (see the deep dive on object management for details). Let's call this lower object Object #B; in the above example, this is the boulder just below the robot.
- If Object #B is on top of another object, then bit 6 of the objectFlags for Object #B will be set, and the number of the object beneath Object #B will be in bits 0 to 5. Let's call this lower object Object #C; in the above example, this is the middle boulder.
- We repeat this process, working down the stack until we reach an object where bit 6 of the objectFlags is clear, which indicates that this object doesn't have another one beneath it. In the above example, this is the bottom boulder.
If we take our example object stack with three boulders and a robot, then this is how the stack looks as a data structure, starting at the top with the tile data for the tile containing the stack:
       +-------------------------+
       |                         |
       |  Tile containing stack  |
       |                         |
       |  Tile data = %11aaaaaa  |
       |  Bits 6-7  = %11        |
       |  Bits 0-5  = %aaaaaa    |
       |                 |       |
       +-----------------|-------+
                         |
                         |
                         v
    +------------------------------+
    |                              |
    |  Object #A: Robot            |
    |  Top object in stack         |
    |                              |
    |  Object number = %aaaaaa     |
    |  objectFlags   = %01bbbbbb   |
    |  Bit 6         = 1           |
    |  Bits 0-5      = %bbbbbb     |
    |                     |        |
    +---------------------|--------+
                          |
                          |
                          v
    +------------------------------+
    |                              |
    |  Object #B: Top boulder      |
    |  Second object in stack      |
    |                              |
    |  Object number = %bbbbbb     |
    |  objectFlags   = %01cccccc   |
    |  Bit 6         = 1           |
    |  Bits 0-5      = %cccccc     |
    |                     |        |
    +---------------------|--------+
                          |
                          |
                          v
    +------------------------------+
    |                              |
    |  Object #C: Middle boulder   |
    |  Third object in stack       |
    |                              |
    |  Object number = %cccccc     |
    |  objectFlags   = %01dddddd   |
    |  Bit 6         = 1           |
    |  Bits 0-5      = %dddddd     |
    |                     |        |
    +---------------------|--------+
                          |
                          |
                          v
    +------------------------------+
    |                              |
    |  Object #D: Bottom boulder   |
    |  Fourth object in stack      |
    |                              |
    |  Object number = %dddddd     |
    |  objectFlags   = %00xxxxxx   |
    |  Bit 6         = 0           |
    |                              |
    +------------------------------+
Note that because the tile contains an object, the tileData entry contains an object number rather than a tile shape and an altitude. So what happens to this data, which we still need to store somewhere? Well, we know the tile shape must be zero as only flat tiles can contain objects, and we also know that the y-coordinate of the bottom object will be the same as the tile altitude, so we can always retrieve it from there. Specifically, the tile altitude will be in the integer part of the bottom object's altitude in yObjectHi, as tile altitudes are always integers.
Given this structure, let's see how we can walk through the object stack, from top to bottom and from bottom to top, and why we might want to do that.
Traversing an object stack from top to bottom
---------------------------------------------
It isn't difficult to take an object stack and work our way through the stack from top to bottom: we just follow the links in the linked list. Similarly, given any object in the stack, we can find out the tile altitude pretty easily by following the stack down to the bottom object and fetching that object's altitude.
This downwards traversal is quite common; a good example is the loop at label tang7 in GetTileViewAngles (Part 3 of 4), which takes the tile data for the tile containing an object and loops downwards through the stack to get the tile altitude from the bottom object. Because both the tile data and the object flags use the same format of having the object number in bits 0 to 5, the loop is satisfyingly compact.
Another example can be found at label tile7 in GetTileAltitude, which fetches a tile altitude even if the tile contains an object stack. This time, though, the loop is stretched out across the bulk of the routine.
The linked list structure also makes it easy to get the details of the top object in a stack, given the tile coordinates: we just grab the tile data, and it contains the object number we're after. This is useful when working out whether the player can create or absorb objects on specific tiles, as those operations only affect the top object in a stack. There's a good example of this in SpawnObjectOnTile, where we quickly check the top object on a tile to work out whether or not we can spawn a new object there.
If we need to work our way up an object stack, however, things are rather more involved, so let's look at that next.
Traversing an object stack from bottom to top
---------------------------------------------
Sometimes we need to walk our way through an object stack from bottom to top. The best example of this is when we draw an object stack on-screen. If the player is high up on the landscape and is looking down at an object stack, then objects lower down the stack will be further away from the player than those at the top, so when we draw the objects on the stack, we need to draw the lowest objects first and the higher objects last, so that the closer objects will be drawn in front of those that are further away.
This example can be seen in the DrawObjectStack routine. The approach is a bit long-winded, but it works like this:
- First of all, loop down through the entire stack to reach the bottom object and make a note of the following (you can see this being done at the start of DrawObjectStack):
- Set Y to the object number of the bottom object (so Object #Y is the bottom object).
- Set objectStackCounter to the total number of objects in the stack.
- We now loop through the objects from bottom to top, drawing them in turn as follows (you can see this loop at label stak2 in DrawObjectStack):
- Check whether Object #Y is at a higher altitude than the player:
- If Object #Y is higher than the player, jump to a part of the code that draws the object stack from the top object down to Object #Y, using a simple top-to-bottom loop as described in the previous section (you can see this loop at label stak6 in DrawObjectStack).
- Otherwise Object #Y is lower than the player and we need to draw the object stack upwards, starting with Object #Y at the bottom, so keep going.
- Draw Object #Y.
- Decrement objectStackCounter so that it contains the number of objects left to draw on the stack, and if we have drawn all the objects, stop the process.
- Starting at the top of the stack, work our way down the list until we have stepped through objectStackCounter objects. The object we reach will be the one above the object that we just drew, as we decremented objectStackCounter in the step above.
- Set Y to the number of the object we just reached, so Object #Y is now the next object up the stack from the one we just drew.
- Loop back to check the altitude of the new Object #Y and continue drawing the stack in the correct direction.
- Check whether Object #Y is at a higher altitude than the player:
This process is a bit of a faff, especially when compared to the much simpler process of walking down an object stack from top to bottom. But it saves memory, as we don't need to store any details of upward relationships in object stacks, and can simply reuse the same bit 0-5 approach as the tile data to store our linked lists. It isn't necessarily elegant, but it's simple and efficient, and sometimes that's just what you need.