Creating, deleting and managing up to 64 objects on the landscape
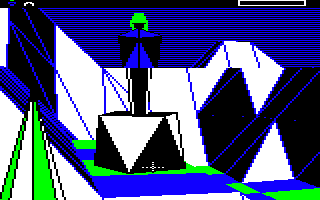
The tiled landscape of The Sentinel is home to a number of 3D objects, from trees and boulders to sentries and meanies. Up to 64 of these objects can be added to the landscape's flat tiles, and some objects can even be stacked on top of one another, like this robot on top of a boulder:
In this article we look at how objects are managed. See the deep dive on stacking objects for more information about object stacks, and check out the deep dives on 3D object definitions and drawing 3D objects for details of how all these objects are drawn on-screen.
Object numbers
--------------
Each object in The Sentinel has an associated object number, from 0 to 63, so the system can support up to 64 objects. The object number is the unique way of referring to each specific object.
Some objects always have the same object numbers; for example, the Sentinel is always object #0, the sentries are always in the range #1 to #7, and the Sentinel's tower is always object #63. All unallocated object numbers are available to use for objects that are created during gameplay, and if an object is absorbed, then its object number will be deallocated and become available for reuse. There are no reserved object numbers as such, it's just that the enemies and tower are spawned onto the landscape first, so they always end up using the same numbers (see the deep dive on adding enemies and trees to the landscape for more about this process).
If we want to add an object to the landscape, then the first thing we need to do is call the GetObjectNumber routine to find an unused object number that we can use for our new object. When calling the routine, we pass it the object type for the new object, as follows:
| Type | Object |
|---|---|
| 0 | Robot (the player object is one of these) |
| 1 | Sentry |
| 2 | Tree |
| 3 | Boulder |
| 4 | Meanie |
| 5 | The Sentinel |
| 6 | The Sentinel's tower |
| 7 | 3D text block: no block (left), block (right) |
| 8 | 3D text block: block (left), no block (right) |
| 9 | 3D text block: block (left), block (right) |
The last three object types are only used when drawing the large 3D text on the title screens - they aren't used in-game at all (see the deep dive on drawing 3D text using blocks for more information).
Assuming the GetObjectNumber returns a suitable object number that we can use for our new object, we can go ahead and actually spawn an object using that number, so let's look at that next.
Spawning and deleting objects
-----------------------------
The data for each object is stored in multiple places, but arguably the most important is the objectFlags table. If the entry in the X-th byte in the objectFlags table has bit 7 set, then this indicates that object number #X has not yet been allocated to an object; conversely, if bit 7 is clear, then object number #X has been allocated to an object, and that object exists on the landscape (in other words, that object has been "spawned", which is the term we use for object creation).
When the game is first started, all 64 entries in the objectFlags table are reset to contain %10000000, to indicate that no object numbers have been allocated yet. The table can also be reset by calling the ResetVariables or ResetTilesObjects routines.
When we call GetObjectNumber, the routine looks for an object number that isn't currently allocated to an object so we can use it to spawn a new object via one of the spawning routines. It does this by searching the objectFlags table for a free number to allocate - i.e. an entry with bit 7 set. It starts at the entry for object #63 and works its way down the table until it finds a free number.
If it finds a new number then it stores the object type in the X-th entry in the objectTypes table and returns to the caller with the new object's number and the processor flags set to indicate success or failure. For example, it will fail to allocate a new object number if we already have 64 spawned objects, as then we can't add any more.
Once we have an object number that we can use for our new object, we need to spawn the object and add it to the landscape. This is done by calling the SpawnObjectOnTile routine, which takes the object number and a tile coordinate as arguments, and attempts to add the object to that tile.
Sometimes this isn't possible - for example, if the tile is already occupied by an object that we can't stack another object on top of, then we can't add our new object to the tile and the spawning process will fail (see the deep dive on stacking objects for more about object stacks). But assuming all is well and we can add our new object to the tile, the spawning routine will clear bit 7 of objectFlags, and the object will be successfully spawned.
The SpawnObjectOnTile routine is the only place where objects are spawned in this way, but it isn't the only spawning routine. There are various other options, all of which call SpawnObjectOnTile to do the actual spawning:
- SpawnObjectBelow attempts to spawn an object on a tile that is below a maximum specified altitude.
- SpawnEnemies spawns the Sentinel and sentries and adds them to the landscape.
- SpawnPlayer adds the player object to the landscape, ideally placing it below all the enemies and in the bottom half of the landscape.
- SpawnTrees adds the correct number of trees to the landscape, ideally placing them below all the enemies in the landscape.
- SpawnSecretCode3D draws the landscape's secret code by spawning a set of large 3D text block objects that make up the code.
- SpawnCharacter3D spawns a text character in large 3D blocks for drawing on the main title screen or secret code screen.
- SpawnTitleObject spawns an object for use on the title screen (in which case it's a robot or the Sentinel) or the game over screen (in which case it's the object responsible for ending the game).
Once an object has been spawned and added to the objectFlags and objectTypes tables, the next step is to configure all the object's settings, from coordinates to gaze angle. Let's look at these next.
Configuring objects
-------------------
Most object characteristics are set in the SpawnObjectOnTile routine when a new object is spawned, though the other spawning routines mentioned in the previous section tend to configure the objects further once they are spawned.
As mentioned above, SpawnObjectOnTile starts by checking whether the tile is a suitable home for the new object (the tile must either be empty or contain an object stack to which we can add the new object). If we can place the object on the tile, then SpawnObjectOnTile goes ahead and configures the object as follows (assuming we are spawning object number #X on the tile):
- The X-th entry in objectFlags has bit 7 cleared to indicate that object number #X has now been allocated to an object.
- The X-th entry in objectFlags has bit 6 set if we are adding the object on top of a boulder (or stack of boulders) or on top of the Sentinel's tower. The object number of the boulder or tower is placed in bits 0 to 5.
- The X-th entry in (xObject, yObjectHi, zObject) is set to the tile coordinate of the newly added object.
- The X-th entry in yObjectLo is set so that yObject(Hi Lo) contains a two-byte y-coordinate that represents the object's exact altitude (see below for an explanation of this value).
- The X-th entry in objectPitchAngle is set to -11, so objects look slightly downwards at a pitch angle of 15.5 degrees. This is the pitch rotation of the object relative to the landscape, so an object with a pitch angle of 0 would be looking straight ahead, and neither up nor down.
- The X-th entry in objectYawAngle is set to a multiple of 11.25 degrees, as determined by the next seed number for the landscape, and then a further 96 is added to it (135 degrees). This is the yaw rotation of the object relative to the landscape, so an object with a yaw angle of 0 would be looking in the same direction as the camera in the landscape preview, i.e. straight towards the rear row of the landscape. The extra 135 degrees is added to make the player's rotation work well on the starting level, though it is added to all objects and not just the player object. Some objects, such as the Sentinel's tower, override this setting to set yObjectLo to zero once the object is ready, but 224 is the default fractional altitude for all objects when they are spawned.
- The tileData entry for the tile containing the object is updated to store the object number #X in bits 0 to 5, and bits 6 and 7 are both set to indicate that the tile contains an object (see the deep dive on tile data for more information about the tile data format).
The two-byte y-coordinate in yObject(Hi Lo) needs more explanation, so let's look at that now.
The object y-coordinate
-----------------------
When talking about the object y-coordinate, it might help to imagine the 3D world as being made up of "tile cubes", with each cube having a side length of one coordinate (i.e. one tile width). If the bottom of the landscape is a flat chess board on the table in front of us, then we can build up our landscape by stacking lots of cubes on the board. Each cube fits nicely onto one chess board square, and the full 3D landscape can be made by stacking cubes on top of each other to create the peaks and valleys of the game world (and, to make this analogy 100% accurate, by carving all of the top cubes on the landscape into the correct shapes to create the undulating world in the preview).
To be more explicit, tile corners are always on integer y-coordinates, as they each have an integer altitude from 1 to 11. This means that flat tile surfaces are always at whole number altitudes, so their y-coordinates are always integers. That said, y-coordinate fractions are used a lot; for example, boulders are 0.5 tiles tall so that affects the altitude of anything placed on top of a boulder, and vector calculations such as ray-casting use fractional values for the calculations. But the "tile cubes" are 1 tile size across in all three dimensions, and tile corners fit into this grid. This also means that the difference in altitude between flat tiles (which are effectively the tops of any uncarved tile cubes) is always a whole number of y-coordinates.
In terms of coordinates, if we place our object on a flat tile and count the number of cubes in the stack beneath it, then the high byte in yObjectHi is an integer that represents the whole number of cubes below the object, and the low byte in yObjectLo represents the fractional altitude of the object relative to the flat tile on which it sits (i.e. the distance between the tile and the object's origin in terms of a fraction of one cube height).
By default, SpawnObjectOnTile sets yObjectHi to the tile coordinate and yObjectLo to 224, so objects are spawned at a height of 224 / 256 above the tile itself, or 0.875 tile widths. This setting is used for the gaze vector calculations, so this is effectively the height of the object's eyes above the tile (see the deep dive on Cartesian coordinates for more details). If we are spawning an object on an object stack, then once it is spawned, the object's altitude will be altered to the correct height on the stack, but the initial spawning process always sets the fractional part to 0.875 tile widths.
This fractional coordinate system for objects is extended even further when we need to do calculations involving objects and gaze vectors (can an object be seen by an enemy?) and visibility (can an object be seen by the player?). The GetObjectCoords routine fetches an object's Cartesian coordinates and returns the result in three 24-bit numbers: xCoord(Hi Lo Bot), yCoord(Hi Lo Bot) and zCoord(Hi Lo Bot). The high byte can be thought of as the integer, with the low and bottom bytes as the fractional part, with two fractional bytes enabling more accuracy when calculating the geometry.
Objects are regarded as always being in the centre of the tiles on which they are placed, so in this more accurate coordinate representation, an object that's been placed directly on the tile that's anchored at (2, y, 3), for example, will actually appear at (2.5, y, 3.5). And as we've discussed above, the y-coordinate - i.e. the altitude of the object above the tile itself - depends on the object type and whether it is stacked on top of another object.
This means that we don't need to store the fractional parts of the object's x- and z-coordinates, because we know those values are always 0.5, but we do need to store the fractional part of the y-coordinate.
Deleting objects
----------------
Objects can be deleted using the DeleteObject routine. Conceptually this is a simple process of setting bit 7 in the relevant objectFlags byte, as that will free up the object number and make it available for the next object to be spawned. However, there are two further steps that need to be done:
- If the object is involved in an object stack, then we need to remove it cleanly from the stack.
- If the object is the only object on the tile, then we need to remove it cleanly from the tile.
To read about how we remove an object from an object stack, see the deep dive on stacking objects.
For solitary objects, we need to undo the process of adding the object to the tile. When we did this during the spawning process, we put the object number into bits 0 to 5 of the relevant tileData entry, and we set bits 6 and 7 to indicate that the tile contained an object. So we need to reverse this and instead change the tile data back into the format that we use for when there is no object on the tile, i.e. with the tile altitude in the high nibble and the tile shape in the low nibble.
We know that the tile shape has to be flat as objects can only be placed on flat tiles, so that means the tile shape must be 0 and we can zero the low nibble of the tile data to capture this. And we can get the tile altitude from the altitude of the object, and specifically from the high byte in yObjectHi, which contains the integer y-coordinate of the tile. So we can finish off by putting yObjectHi into the top nibble of the tile data byte, and that concludes the deletion process.
Object variables and routines
-----------------------------
There are quite a few tables that are involved in managing objects in the game world. To finish off, here's a list of all the variables that are related to object management:
| Variable | Description |
|---|---|
| objectFlags | Object flags for up to 64 objects (object number allocation, object stack details) |
| objectTypes | Object types for up to 64 objects |
| objectPitchAngle | The pitch angle for each object (i.e. the vertical direction in which it is facing) |
| objectYawAngle | The yaw angle for each object (i.e. the horizontal direction in which it is facing) |
| xObject | The integer x-coordinate of the tile containing the object (i.e. along the left-right axis) |
| yObjectHi | The integer part of the object's y-coordinate, i.e. the altitude in tile cubes |
| yObjectLo | The fractional part of the object's y-coordinate, i.e. the fractional altitude above the tile surface |
| zObject | The integer z-coordinate of the tile containing the object (i.e. along the axis into and out of the screen) |
And here are two lookup tables containing read-only object data:
| Variable | Description |
|---|---|
| objectTypeEnergy | The amount of energy encapsulated in each type of object, i.e. the amount of energy acquired or spent when absorbing or creating the object |
| objectHalfWidth | Each object's width in terms of tile widths, for half of the object only |
Finally, here's a list of all the routines that enable us to manage objects in the landscape:
| Subroutine | Description |
|---|---|
| GetObjectNumber | Fetch an object number that we can use for a new object |
| SpawnObjectOnTile | Spawn an object on a tile, putting it on top of any existing boulders or towers |
| SpawnObjectBelow | Spawn an object on a tile that is below the maximum altitude specified in A |
| SpawnEnemies | Spawn the Sentinel and sentries and add them to the landscape |
| SpawnPlayer | Add the player object to the landscape, ideally placing it below all the enemies and in the bottom half of the landscape |
| SpawnTrees | Add the correct number of trees to the landscape, ideally placing them below all the enemies in the landscape |
| SpawnCharacter3D | Spawn a text character on the landscape in large 3D blocks for drawing on the main title screen or secret code screen |
| SpawnSecretCode3D | Draw the landscape's secret code by spawning a set of large 3D text block objects |
| SpawnTitleObject | Spawn object #1 for the title screen (a robot or the Sentinel) or the game over screen (the object responsible for ending the game) |
| DeleteObject | Delete an object, removing it from the landscape and vacating its object number |
| GetObjectCoords | Get an object's coordinates |
For more information on how object stacks are managed, check out the deep dive on stacking objects.