How the game adds objects to the tile landscape
The deep dive on generating the landscape explains how The Sentinel creates 10,000 different landscapes by using a pseudo-random landscape seed generator and a collection of smoothing and scaling algorithms to convert 1024 numbers into a tiled landscape for the player to explore.
But before the game can commence, we need to add a few more things to the landscape, namely the player, the enemies and a collection of trees. Here's a rather tilted overview of landscape 0000, showing the tiles containing these various objects (you can click on the image to see a bigger version, as with all the images in this article):
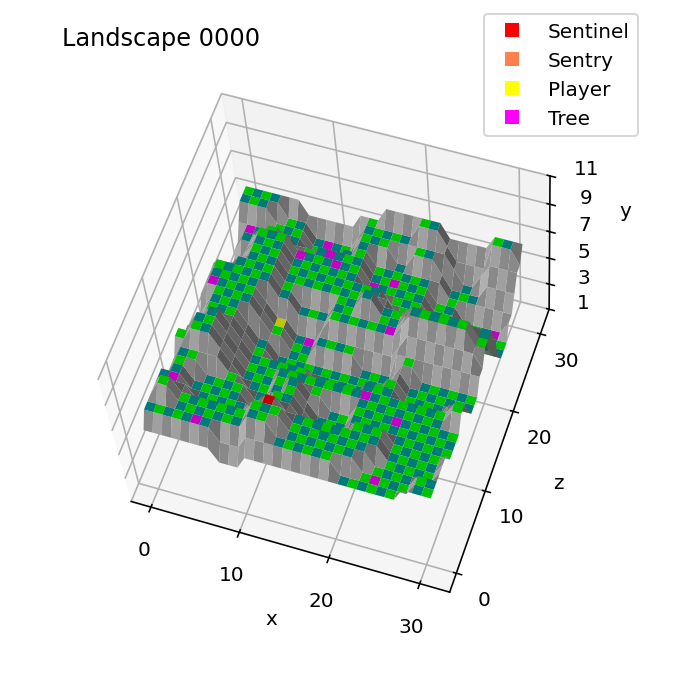
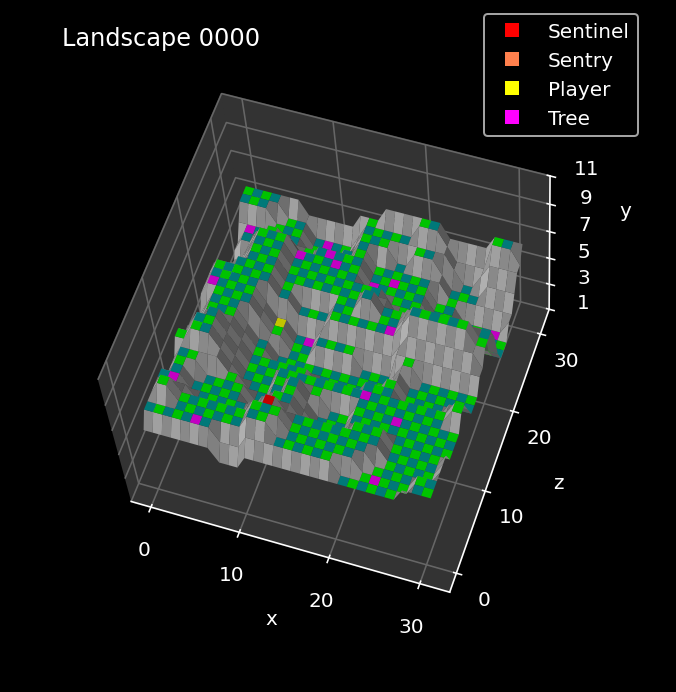
As it's the starting point for the game, landscape 0000 doesn't have any sentries, so it only has the Sentinel (the red tile in the bottom-centre of the image above), the player (the yellow tile just above the Sentinel) and 16 trees (the purple tiles that are scattered around the landscape).
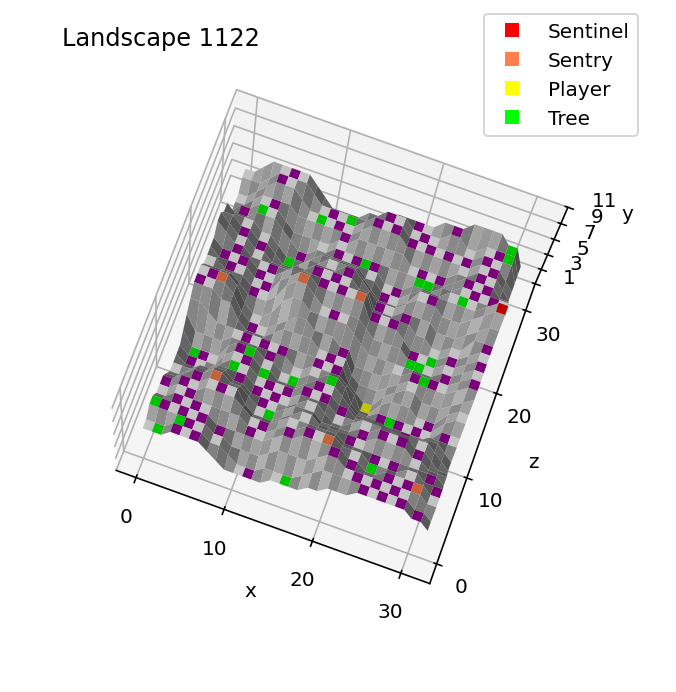
By comparison, landscape 1122 has quite a bit more going on, with the Sentinel and six sentries alongside the player and trees. You can see the sentries in orange in the following image:
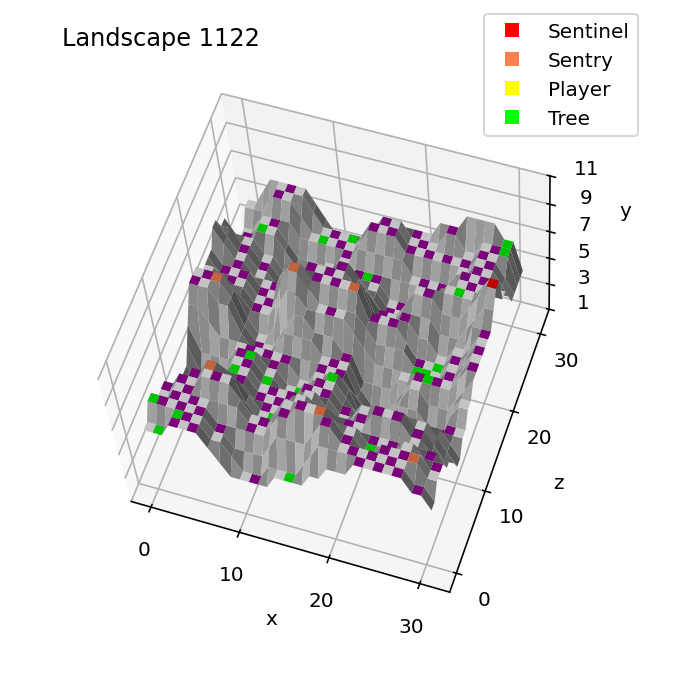
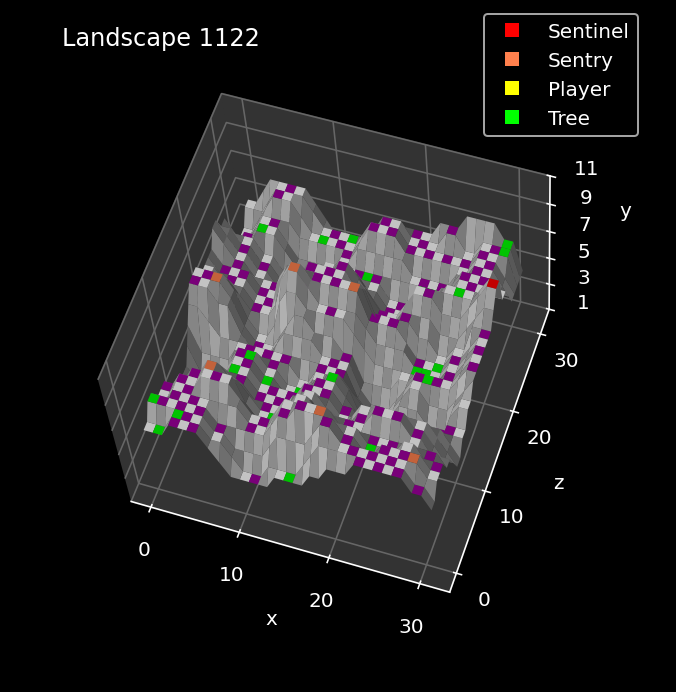
Interestingly, you can't see the yellow tile of the player in the above image, because landscape 1122 is so steep that the player is hidden from view even in this tilted image. If we tilt the image towards us a bit more, then you can see the player's yellow tile hiding on the only tile at the bottom of a chasm in the bottom-right quarter:
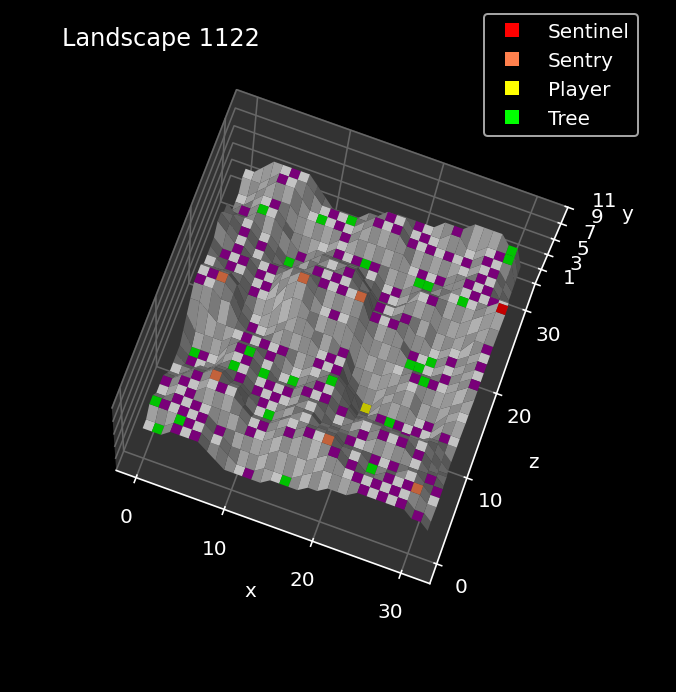
As the player can't see any other tiles from this position, the only possible move is to hyperspace to start the game, and with a total of seven enemies, that's a pretty scary start to the level.
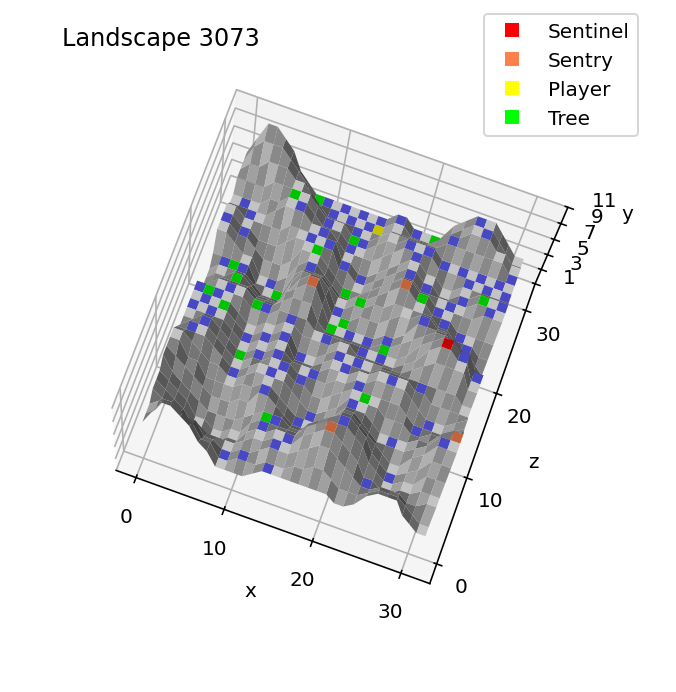
Landscape 3073 is even steeper, with four sentries and the player starting on a tile on the rear plateau:
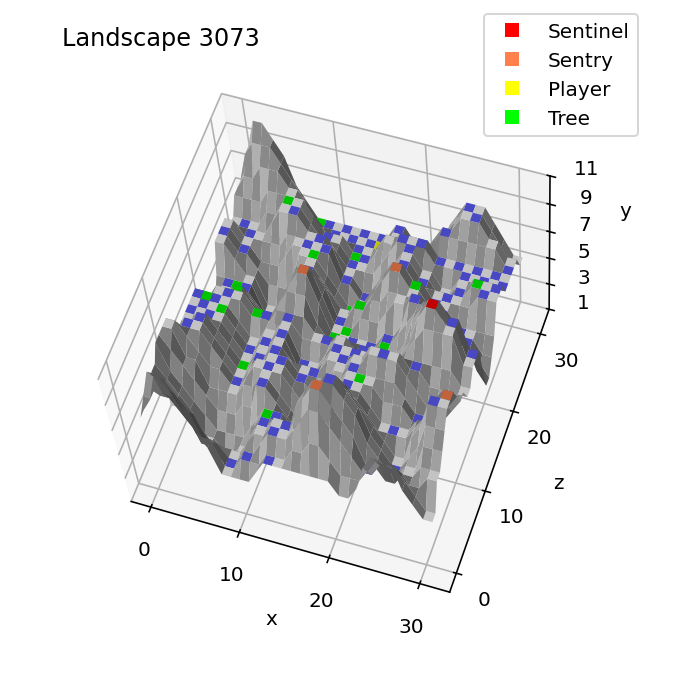
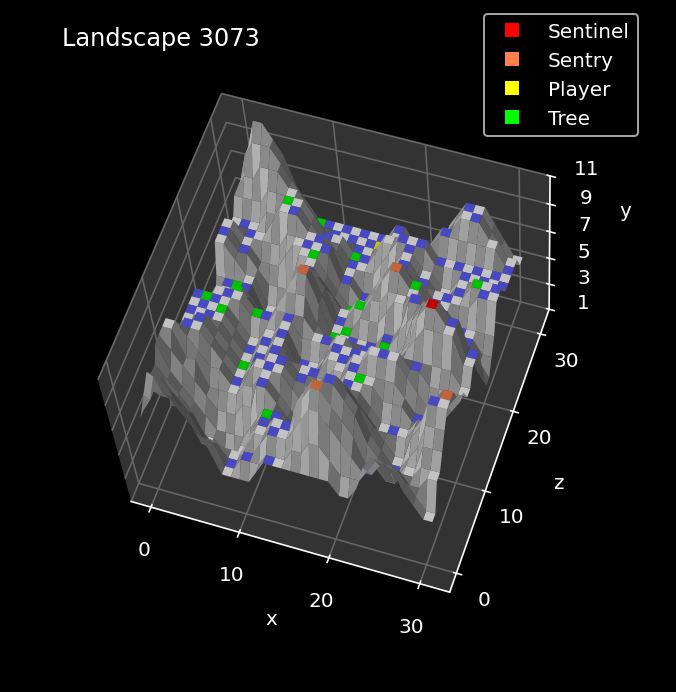
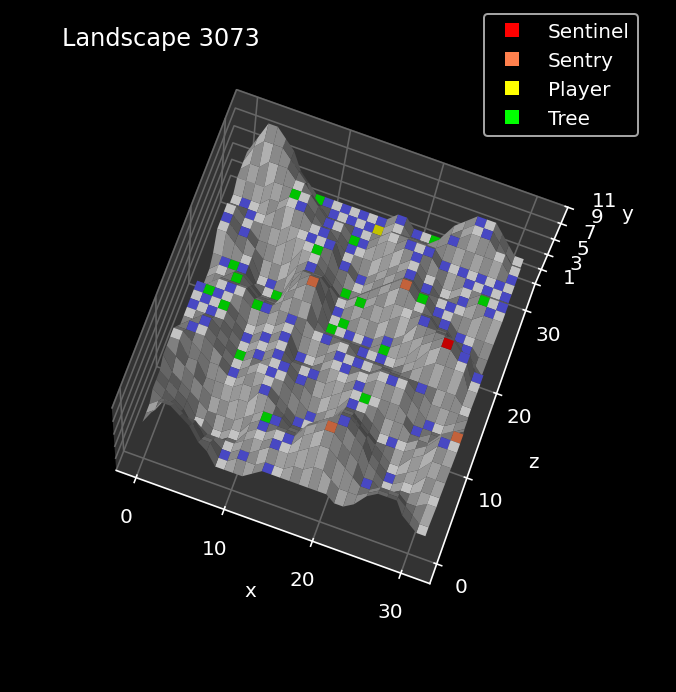
You can only just make out the yellow player tile at the back, as it's mostly obscured by mountains in this image, so here's a more tilted version that shows the player more clearly:
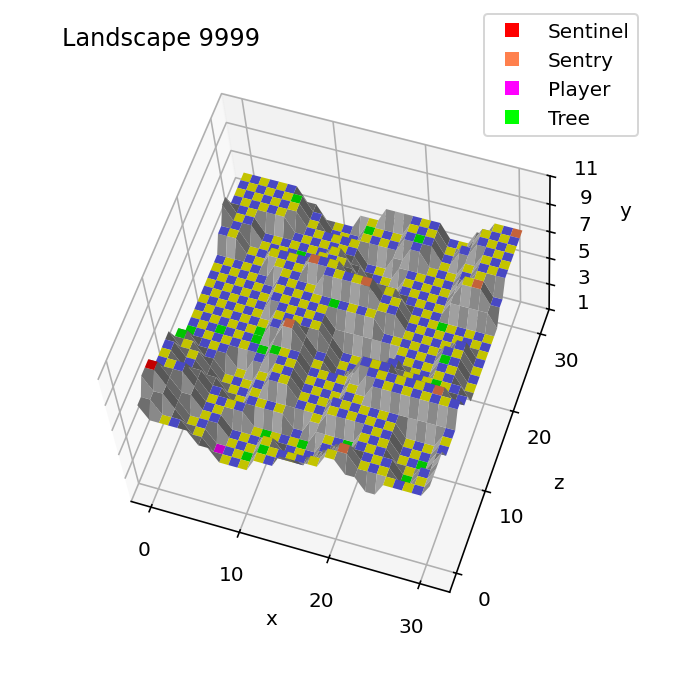
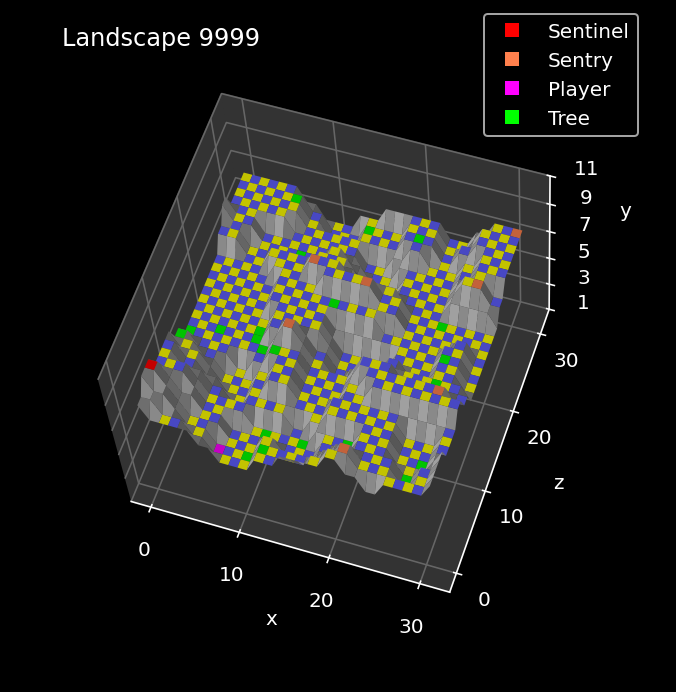
And finally, landscape 9999 is relatively gentle in terms of landscape shape, but with a full house of seven sentries and the Sentinel looking for the player, it's a tricky landscape to hide in:
The process of adding objects to the landscape uses more landscape seeds and more algorithms, and it's more complex that you might think. Let's look at the steps involved.
Adding objects to the landscape
-------------------------------
There are two places in the code where enemies, the player and trees are added to the landscape:
- If we are about to play a new landscape, then PreviewLandscape takes over from the GenerateLandscape routine once the latter has generated the tile data. PreviewLandscape then adds the enemies, displays the preview screen, and only then adds the player and the trees (so the preview only shows the enemies and doesn't show the player or trees).
- If the player has just beaten the Sentinel, then we need to display the secret code for the next landscape that's just been unlocked. To do that we call the GetNextLandscape routine to generate the new landscape and add all the objects but without previewing the landscape, as this is how we get the secret code (see the deep dive on the landscape secret code for details).
Here's a top-level breakdown of the process for adding all the game objects to the landscape. We'll go into more detail about each step below, and you can click on a step number to jump straight to the detailed explanation:
| Step | Summary | Description | Code |
|---|---|---|---|
| 1 | Calculate number of enemies | Calculate the number of enemies for this landscape | GetEnemyCount |
| 2 | Calculate highest tiles | Calculate both the highest tiles in each 4x4 block of tiles in the landscape and the altitude of the highest tile in the landscape | GetHighestTiles |
| 3 | Add enemies | Add the required number of enemies to the landscape, starting from the highest altitude and working down once each contour is full | AddEnemiesToTiles |
| 4 | Set palette | Set the landscape palette according to the number of enemies | SpawnEnemies |
| 5 | Add player | Add the player object to the landscape, ideally placing it below all the enemies and in the bottom half of the landscape | SpawnPlayer |
| 6 | Add trees | Add trees to the landscape, ideally placing them below all the enemies in the landscape | SpawnTrees |
Let's work through each of the steps in turn.
1: Calculate the number of enemies
----------------------------------
The first step is to calculate how many enemies this particular landscape has. The number of enemies is always in the range 1 to 8, with higher landscape numbers typically producing more enemies. One of these enemies is the Sentinel, who surveys the landscape along with anything from zero to seven sentries.
The number of enemies is calculated as follows:
- Take the top digit of the four-digit landscape number and add 2 (so for landscape 5678 that would be 5 + 2 = 7). Store this in T, so T is in the range 2 to 11, with higher values of T for higher landscape numbers.
- Fetch the next number from the landscape's sequence of seed numbers.
- Set Y to the number of leading zeroes in bits 0 to 6 of the seed number, when written down in binary. So with the seed number %00010110, for example, bits 0 to 6 are %0010110 and Y would be set to 2. Y is always in the range 0 to 7.
- If bit 7 in the seed number that we fetched is set, then flip all the bits in Y, which will turn Y into the range -1 to -8. This means that Y is now a number in the range -8 to +7.
- Add T and Y to get a number in the range -6 to 18.
- If the result is in the range 0 to 7 then add 1 to get the number of enemies, and we are done; if the result is not in the range 0 to 7, jump back to fetch another seed number and repeat the process until we get a suitable number of enemies.
This process generates a random number of enemies that tends to be bigger for higher landscape numbers, but isn't always. Here's a graph of sentry numbers (0 to 7) vs the landscape number (0000 to 9999):
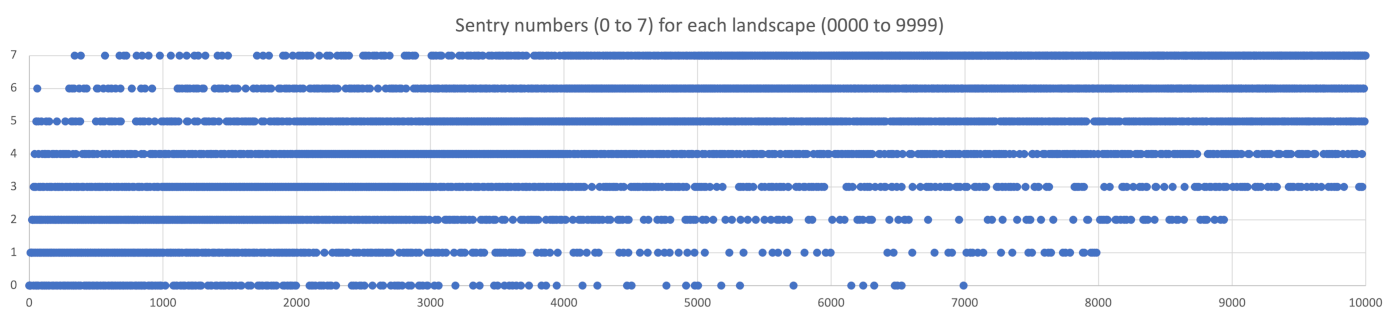
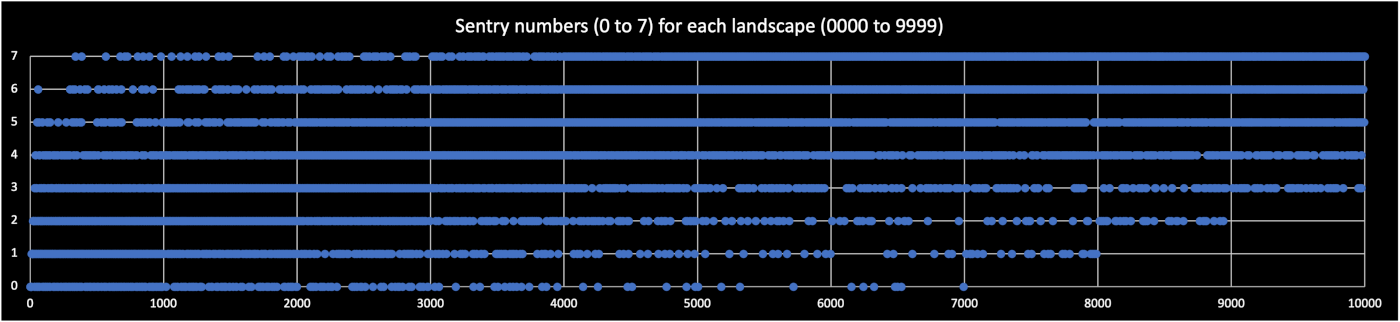
You can see that the trend is that higher landscape numbers tend to produce more enemies, but there are outliers: landscape 6992 in the bottom-right has no sentries, for example, while landscape 0340 in the top-left has a full complement of seven.
The result of the above calculation is stored in the numberOfEnemies variable and is used (amongst other things) to set the landscape palette in step 4.
2: Calculate the highest tiles
------------------------------
The second step is to calculate the heights of all the flat tiles in the landscape, in a way that enables us to place the Sentinel on the highest point and the sentries (if there are any) at the next highest levels, all while preventing crowding.
To this end, the GetHighestTiles routine works through the tile corners in the landscape in 4x4 blocks and finds the highest flat tile within each block, so we can consider putting an enemy there.
To do this we split the 32x32-corner landscape up into 64 (8x8) blocks of 4x4 tile corners each, iterating along each row of 4x4 blocks from left to right, and then moving back four rows to the next row of 4x4 blocks behind. Because the tile corners along the right and back edges of the landscape don't have tile altitudes associated with them, we ignore those corners.
The results are stored as follows:
- The maxAltitude table contains the altitude of the highest tile in each of the 64 4x4 blocks in the landscape.
- The xTileMaxAltitude table contains the tile x-coordinate of the highest tile in each 4x4 block in the landscape.
- The zTileMaxAltitude table contains the tile z-coordinate of the highest tile in each 4x4 block in the landscape.
- The tileAltitude variable contains the altitude of the highest tile in the entire landscape.
The first three are 64-byte tables that are laid out with one byte for each 4x4 tile block, starting in the front-left corner of the landscape at tile coordinate (0, 0), and moving along the front row from left to right, and then moving back by four tiles and moving along that row from left to right, until we reach the rear row of 4x4 blocks.
The rear row and rightmost column of blocks are one tile smaller, so they are 4x3-tile and 3x4-tile blocks, with the far-right block being 3x3 tiles.
You can picture this as partitioning the 31x31-tile landscape into an 8x8 chess board, where each square on the chess board is made up of a 4x4 block of landscape tiles (and with smaller blocks along the right and rear edges).
The last result, tileAltitude, is an integer that contains the altitude of the highest tile in the landscape, which we can use to place the Sentinel.
3: Add the enemies
------------------
The third step takes the altitudes of the 4x4 tile blocks from step 2 and adds the enemies to the appropriate tiles. This is done in the AddEnemiesToTiles routine.
We start with the Sentinel and then move on to the sentries (if there are any). The process is the same for both types of enemy:
- Call the GetTilesAtAltitude routine to generate a list of suitable 4x4 tile blocks for the enemy, ideally at the altitude at which we would like to place the enemy (but lower if necessary). This calculation uses the values from the maxAltitude table that we populated in step 2.
- Choose one of these tile blocks for our enemy and spawn an enemy object on the highest tile in that block (see the deep dive on object management for information about spawning objects).
- Remove the chosen tile block and all its immediate neighbours from the list, so when we repeat this process for the next enemy, it will not be added too close to any enemies we've already added to the landscape.
- Repeat the process for the next enemy.
The GetTilesAtAltitude routine in the first step calculates the list of suitable tile blocks by working through the result tables from step 2 and returning a list of all 4x4 tile blocks whose highest tile is at the altitude specified in tileAltitude. If there aren't any tile blocks at an altitude of tileAltitude, then we subtract 1 from tileAltitude and try again.
Note that the value of tileAltitude starts out at the altitude of the highest tile in the landscape, so when we spawn the Sentinel object, we try to place it at the highest point on the landscape. The value of tileAltitude gets reduced as we add more enemies and the higher altitudes fill up, so the sentries are also placed as high as possible, but we work down the landscape when there isn't any more room at the top. If we end up working our way down to altitude 0 without finding any suitable tile blocks, then we stop adding enemies at that point.
Assuming GetTilesAtAltitude does return a suitable list of 4x4 tile blocks, the selection process starts. This has a number of steps:
- Fetch the next number from the landscape's sequence of seed numbers.
- Reduce this number so it can be used as an index into the list of 4x4 tile blocks, as follows:
- Along with the list of tile blocks, GetTilesAtAltitude also returns the length of the list in T, as well as a bit mask that contains the same number of leading zeroes as T, with the rest of the bits all set.
- Apply the bit mask to the seed number, so it now contains same number of leading zeroes as the number of tile blocks in the list. This means the range of the seed is now between 0 and the lowest power of 2 that's greater or equal to the list size. Specifically, if the list contain n entries, this reduces the seed into the range:
0 to 2^ceil(log2(n)) - 1
For example, if the list contains 11 entries, then this reduces the seed into the range 0 to 15, as 16 is the lowest power of 2 that is greater or equal to 11. - If the reduced seed is greater than or equal to T, then loop back to pick another seed number and repeat the same process, until we have a number in the range 0 to T - 1.
We now have a number in the range 0 to T - 1, which we can use to choose an entry from the list of 4x4 tile blocks at the correct altitude. So we can go ahead and spawn the enemy within that tile block, as follows:
- Update the maxAltitude table to zero the altitude of the tile block we've chosen, plus all the tile blocks that are immediate neighbours (so we zero the maxAltitude for a total of nine tile blocks, assuming we're not at the edge of the landscape). This will prevent the GetTilesAtAltitude routine from returning any of these tile blocks in future, so this ensures no further enemies will get placed too close to the enemy we're adding now.
- Call SpawnObjectOnTile to spawn an enemy object on the highest tile in the tile block that we've chosen. This also fetches the next seed number for the landscape and uses this to set the object's yaw angle (see the deep dive on object management for details of this process). If we are spawning the Sentinel, we first spawn the Sentinel's tower, and then spawn the Sentinel on top of that.
- Reset the meanie data for the enemy we just added, so the enemy is not marked as having turned a tree into a meanie (see the deep dive on enemy tactics for details).
- Fetch the next number from the landscape's sequence of seed numbers.
- Set the enemy's tactics timer to the seed number, converted into the range 5 to 63, so this sets the timer to somewhere between 4 * 0.06 = 0.24 seconds and 62 * 0.06 = 3.72 seconds. See the deep dive on enemy timers and state variables for details.
- Set the enemy's yaw step to either 20 or -20, according to bit 0 of the seed number. The enemy's yaw step is the angle through which the enemy rotates on each scheduled rotation, so this means we are setting the rotation to either +20 degrees (a clockwise turn) or -20 degrees (an anticlockwise turn). See the deep dive on enemy tactics for details.
We repeat the above process for all the enemies we need to add to the landscape, until we're done or have run out of room on the landscape. And as a final step, we set minEnemyAltitude to the altitude of the last enemy that we added, so when we come to add the player in step 5, we can try to ensure the player starts at a lower altitude than all the enemies.
4: Set the palette
------------------
The fourth step is to set the palette for the landscape. This depends on the number of enemies, which we calculated in step 1 and stored in the numberOfEnemies variable.
There are eight different landscape palettes, which are set by defining logical colours 0, 1, 2 and 3 to the physical colours in the list:
- Enemy count = 1: blue, black, white, green
- Enemy count = 2: blue, black, yellow, red
- Enemy count = 3: blue, black, cyan, yellow
- Enemy count = 4: blue, black, red, cyan
- Enemy count = 5: blue, black, white, red
- Enemy count = 6: blue, black, yellow, cyan
- Enemy count = 7: blue, black, cyan, red
- Enemy count = 8: blue, black, red, yellow
The physical colour numbers for the different palettes are taken from the landscapeColour2 table (for logical colour 2) and the landscapeColour3 table (for logical colour 3), using an index of numberOfEnemies - 1.
See the deep dive on colours and palettes for more information.
5: Add the player
-----------------
The fifth step is to add the player, now that the enemies have been placed.
First of all, we fetch an object number for the player object and store this in the playerObject variable (see the deep dive on object management for details of this process). Once we have an object number, we move on to spawning the player object and adding it to the landscape.
If this is landscape 0000, then the player is always spawned on the tile with coordinates (xTile, zTile) = (8, 17), by calling the SpawnObjectOnTile routine with these hard-coded coordinates. Without this override the player would be placed on tile (9, 29), which is at the bottom of a steep pit from which you can hardly see anything, so hard-coding the start point for landscape 0000 gives first-time players a better view and an easier start point.
Landscape 0000 is the only landscape that has a hand-picked starting point; all the other landscapes calculate the starting point, as follows.
First we take the ideal starting altitude for the player. This is given by the minEnemyAltitude variable, which we set to the altitude of the last enemy that we added, back in step 3. We now calculate:
A = min(6, minEnemyAltitude)
So A contains an altitude that is no higher than any enemies and is no greater than 6. We can use this as a cap on the player's starting altitude to ensure that the player starts below all the enemies, and in the bottom half of the landscape (which ranges from altitude 1 to 11).
The actual placement is performed by the SpawnObjectBelow routine, to which we pass the maximum desired altitude of the player via the tileAltitude variable. We then do the following, trying up to 255 different tiles with this value of tileAltitude:
- Call GetNextSeed0To30 twice to fetch the next two numbers from the landscape's sequence of seed numbers, converting them with an AND into the range 0 to 31, and then fetching another seed if the conversion gives us 31 (so we eventually get two numbers in the range 0 to 30). We now use these numbers as the (xTile, zTile) coordinates of a tile on which we can now attempt to place the player.
- If the chosen tile contains an object, then go back to pick another coordinate to try, until we have tried a maximum of 255 tiles.
- If the chosen tile is not flat, then go back to pick another coordinate to try, until we have tried a maximum of 255 tiles.
- If the altitude of the chosen tile is equal to or higher than the maximum altitude in tileAltitude, then this tile is too high, so go back to pick another coordinate to try, until we have tried a maximum of 255 tiles.
- If we get here then we have found an unoccupied flat tile with an altitude that's less than tileAltitude, so we place the player object on this tile and we're done.
If we have tried 255 tiles at this altitude and haven't found a suitable tile for the player, then we increment tileAltitude and have another 255 attempts to find a suitable starting point for the player, repeating the process until we've found a tile where we can spawn the player.
6: Add the trees
----------------
The final step is to add the correct number of trees to the landscape, which is done in the SpawnTrees routine.
First, we need to calculate the number of trees to add to this landscape, which we do as follows:
- Call GetNextSeed0To22 to get the next seed number for the landscape and convert it into the range 0 to 22. We do this by extracting bits 0-2 and bits 3-6 of the number and adding the resulting two numbers together. Bits 0-2 give a number in the range 0 to 7 and bits 3-6 give a number in the range 0 to 15, so the sum is in the required range of 0 to 22.
- Add 10 to the result get a number in the range 14 to 32.
- Cap the result to a maximum value of 48 - 3 * numberOfEnemies
The resulting number is the number of trees that we add to the landscape.
Note that the last step only affects the result when numberOfEnemies is six or more, at which point it reduces the range as follows:
- When numberOfEnemies = 6, the range is capped to 10 to 30.
- When numberOfEnemies = 7, the range is capped to 10 to 27.
- When numberOfEnemies = 8, the range is capped to 10 to 24.
As the number of enemies and trees determines the amount of absorbable energy in the landscape, this calculation ensures that the total is never greater than 49 energy units (with a tree being worth one unit, a sentry being worth three units and the Sentinel being worth four units). This maximum amount is only possible in landscapes with six or more sentries and when the calculated number of trees is at the cap, in which case the total absorbable energy can be worked out as follows:
  Maximum energy in tree form = 48 - 3 * numberOfEnemies

  Energy in sentry form = (numberOfEnemies - 1) * 3
                        = 3 * numberOfEnemies - 3

  Energy in Sentinel form = 4

  Total = 48 - 3 * numberOfEnemies + 3 * numberOfEnemies - 3 + 4
        = 48 - 3 + 4
        = 49
Having calculated the number of trees, we now add them to the landscape, again using the SpawnObjectBelow routine for each tree, and again with the maximum altitude set to minEnemyAltitude, which is still set to the altitude of the lowest enemy. This means we try to spawn all the trees at a lower altitude to the enemies, though because there may be a lot of them, the chances are that the algorithm will end up having to search for higher altitudes to fit them all in.
Next steps
----------
By this point we have generated the landscape and added enemies, the player and trees. The landscape is now finished and is ready to play, but there is one more important step.
We now need to generate the landscape's secret code, either to display it on-screen (if the player has just beaten the Sentinel), or to check it against the secret code that the player has entered (if we are about to play a new landscape). For details of this next step, see the deep dive on the landscape secret code for details.