How the landscape preview is created at the start of each level
Before starting each new landscape, the game displays a preview of the entire landscape, like this:
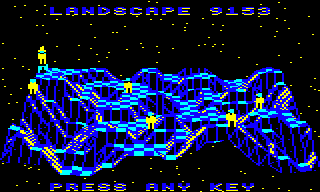
You can see lots more examples of the landscape preview in the deep dive on colours and palettes, but they all share the same layout: there's the full landscape in front of us, with the Sentinel and sentries perched on top of its highest points, ready for battle.
It turns out that there isn't much to say about the landscape preview, but that's the point: like the title screens, the preview uses the exact same graphics engine as the game to display the landscape, with no significant hacks or changes, and that in itself is worthy of its own article, even if that article doesn't say a great deal.
Let's see how it works, anyway.
Drawing the preview
-------------------
The landscape preview is drawn by the PreviewLandscape routine, which is called just after the landscape has been generated (see the deep dive on generating the landscape for more details). The drawing process looks like this, though this is hidden from the viewer by making the screen palette all-blue, as described in the deep dive on colours and palettes:
The first step is to add enemies to the landscape by calling the SpawnEnemies routine (see the deep dive on adding enemies and trees to the landscape for details). This adds the objects for the Sentinel and any sentries, but it doesn't add the player or trees. It's at this point that we draw the landscape preview, so it only shows the enemies and no other objects.
As the landscape preview is a kind of title screen, it is displayed by the DrawTitleView routine being called with the relevant parameters. These parameters control whether we display a 3D object on the screen (which we don't in this case), the style of the background (which is always black with stars for the preview) and the view type (which is set to 0 for the landscape preview and gets stored in the viewType variable - see below for details on how this is used).
The DrawTitleView routine then sets six variables by fetching values from six lookup tables that contain different settings for the landscape preview and the other title screens. We use these variables to define object #16, which we use as the viewing object (i.e. the camera) when drawing the landscape in the preview.
| Lookup table | Value | Variable | Description |
|---|---|---|---|
| xTextViewer | 15 | xObject+16 | x-coordinate of the viewer |
| yTextViewer | 33 | yObjectHi+16 | y-coordinate of the viewer |
| zTextViewer | 194 | zObject+16 | z-coordinate of the viewer |
| textViewerPitch | -22 | objectPitchAngle+16 | Pitch angle of the viewer |
| textViewerYaw | 0 | objectYawAngle+16 | Yaw angle of the viewer |
| titleOffset | 0 | xTitleOffset | Title offset |
The coordinates are in terms of whole tile sizes, so the camera is positioned in the middle of the landscape (xTextViewer = 15), 33 tile heights above the landscape floor (yTextViewer = 33), and 194 tiles in front of the landscape (zTextViewer = 194). The camera is pointing down at an angle of 30.9 degrees (textViewerPitch = -22) and neither left nor right (textViewerYaw = 0). The title offset is 0 so no offset will be applied in the drawing routines, as this is only needed when drawing large 3D text, which we don't use on the preview (see the deep dive on drawing 3D text using blocks for details).
Because the z-coordinate is so big, the camera is a long way from the landscape so the entire landscape will fit onto the screen. The landscape is 31x31 tiles in size, just to put it in context.
Having set it all up, all we need to do is set viewingObject to 16 (so that object #16 acts as the camera), and then call the DrawLandscapeView routine to draw the landscape, using the exact same code as when we draw the scrolling landscape view in-game. And that's how the landscape preview works.
Micro and macro graphics
------------------------
To reiterate: we draw the landscape preview using the exact same routine that is used to draw the 3D objects in much higher resolutions during the game.
To be completely accurate, there is one minor difference in the drawing process for the landscape preview, and that's in the GetObjectAngles routine, which is called as part of the object-drawing process (see the deep dive on drawing 3D objects for details). In this routine we check whether this is the landscape preview by testing the viewType variable, and if it is then we rotate all the objects to face the camera by changing their yaw angles to 128. We also draw all the objects apart from the Sentinel's tower at twice the size and at a slightly higher altitude than they normally would be, just so they stand out better at such a distance. But apart from these minor tweaks, we simply draw the landscape preview using the same routine that's used to draw the landscape in-game.
I'd always assumed that the enemies on the landscape preview were little sprites, particularly the Sentinel, as they're like perfectly designed stick men. This is particularly obvious in landscape 9000, where the colours make them really stand out:
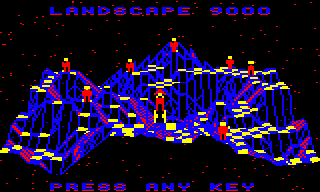
I mean, look at all those mean, hulking robots! They're so cute! So cute that they really need to be extracted into their own rogue's gallery:

Astonishingly, these are not hand-crafted sprites, they are just the normal in-game object-drawing routines working beautifully at a very small scale. Even in the simplest parts of the game, Geoff Crammond's attention to detail shows through...