Creating beautifully smooth and fully filled 3D graphics using buffers
The Sentinel's scrolling landscape is effectively the game's user interface: it is, after all, how the player interacts with the 3D world of the eponymous antagonist. Its beautifully filled 3D graphics are arguably the game's most impressive technical achievement, but there's a problem: it takes a fair amount of time to draw such a complex combination of tiles and slopes and 3D objects, so we can't simply redraw the whole screen every time we want to show a slightly different view (if we did, the frame rate would be measured in seconds, and that would just feel clunky).
The solution is two-fold. First, we scroll the screen by a fixed amount whenever the player pans the view, so we only need draw a small part of the landscape that can be scrolled into the main landscape view on each pan; and second, we draw the new bit of landscape into a screen buffer and only start the scrolling process once we have finished the drawing process. The first part makes the amount of time that we have to wait for a scroll acceptably short, and the second part makes the scrolling process feel smooth, as we're copying from a buffer into screen memory rather than having to draw the complex landscape in full view of the player.
In this article we're going to look at the screen buffers that make the drawing process nice and smooth when we need to update the custom screen mode with its 25 character rows. We'll start by looking at the icon screen buffer for the single row at the top of the screen, and then we'll look at the landscape view screen buffer, which covers the other 24 character rows.
For more information on the drawing and scrolling processes that actually use these two screen buffers, see the deep dives on drawing the landscape view and panning and hardware scrolling.
The icon screen buffer
----------------------
Before we get stuck into the more complex screen buffers that power the scrolling landscape view, let's quickly talk about the other screen buffer in The Sentinel: the icon screen buffer.
This screen buffer looks after the energy icon and scanner row at the top of the main game screen:
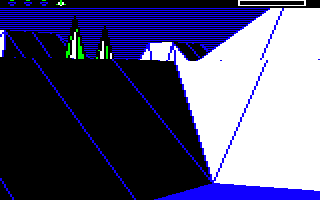
The top row is pretty static and only updates when the player's energy levels change or the player is being scanned, so it might seem odd that the contents of this row are buffered. The reason is that the scrolling landscape works by using hardware scrolling to scroll the entire screen, so whenever the player pans, the entire screen gets scrolled and the top row unavoidably gets scrolled along with the landscape view (see the deep dive on panning and hardware scrolling for details). We therefore need to redraw the top row every time we scroll the screen, and the quickest way to do this is by keeping the contents of the top row in a screen buffer, and then copying that row into the top row of screen memory after every single scrolling step.
The icon screen buffer only needs to contain one character row, which comes to 320 bytes of screen memory. The buffer lives at iconBuffer, and its contents are copied into screen memory by the ShowIconBuffer routine, which is called by the interrupt handler after every scroll step while a pan is in progress. The buffer is also copied to screen memory whenever the contents is changed by routines like DrawIcon, and we can calculate the current address of the icon and scanner row in screen memory by using the GetIconRowAddress routine (as the address changes whenever the screen is scrolled).
It's worth noting that the icon screen buffer shares its memory location with the xPolygonLeft and xPolygonRight tables, which are used to store coordinates when drawing polygons. This sharing process works because we only need to update the top row when a pan is being scrolled onto the screen, or during the gameplay loop (if the player's energy changes or scanning is in progress), and we don't need to draw the landscape view at the same time as either of these two events.
The landscape view screen buffer
--------------------------------
The screen buffer for the scrolling landscape view is rather more complicated than the icon screen buffer. Instead of covering just one character row, the scrolling landscape view screen buffer (which I'll just call "the screen buffer" from now on) consists of 24 different buffers that are interleaved with each other and with the game code. These individual buffers are numbered from screenBufferRow0 to screenBufferRow23, and we'll explore how they work in the rest of this article.
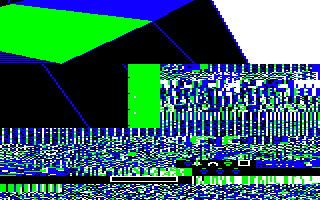
The best way to understand the screen buffer is to visualise it - quite literally. If we hack the game code to display the screen buffer instead of normal screen memory, then this is the kind of thing we might see:
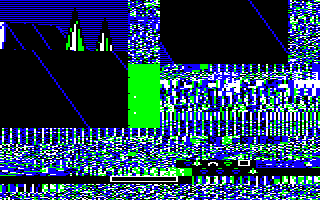
In the screenshot above, the messy parts contain game code or data, and the screen buffer is in two parts in the top-left and top-right of the image. There are two possible configurations for the screen buffer - it can be a row buffer or a column buffer - and in this case we're looking at the screen buffer when it's been configured as a column buffer. This means the contents of the buffer is in the shape of a column of screen content, with 24 character rows of content.
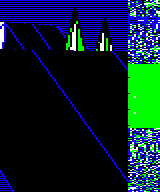
If we highlight the screen buffer, marking each of the buffer's 24 rows separately, you can see where the buffer contents are in memory:
In this case the buffer contains a vertical strip (or "column") of newly revealed landscape that gets scrolled into the edge of the screen when the player is panning to the left. This is all explained in the deep dive on panning and hardware scrolling, but for now, just notice that the screen buffer is in two sections, with a tall section in the top-left of the screenshot and a shorter section in the top-right.
If you stack the contents of the top-left section above the contents of the top-right section, then you can see the full contents of the column buffer:
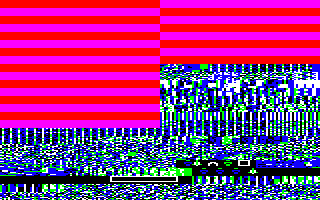
You'll notice that the buffer contains a mess on the right. This is because in this example we are scrolling the landscape using a pan, and each sideways pan scrolls the landscape view by 16 character columns. When the screen buffer is configured as a column buffer, each individual row in the buffer can contain up to 20 character columns, so in this case we simply don't use the right four columns of each individual buffer. (In this specific example, the extra four columns actually contain the remnants of the secret code stash from the landscape generation process, which is no longer needed when the game starts and the memory can be reused for the screen buffer; see the deep dive on anti-cracker checks for more about the secret code stash.)
If we split the screen buffer up into the separate rows, then the layout in memory looks like this (where 0 to 23 denote the individual buffers from screenBufferRow0 to screenBufferRow23):
&3F00 0 =  |
= 16 &3FA0 |
&4040 1 =  |
 = 17 &40E0 = 17 &40E0 |
&4180 2 =  |
 = 18 &4220 = 18 &4220 |
&42C0 3 =  |
 = 19 &4360 = 19 &4360 |
&4400 4 =  |
 = 20 &44A0 = 20 &44A0 |
&4540 5 =  |
 = 21 &45E0 = 21 &45E0 |
&4680 6 =  |
 = 22 &4720 = 22 &4720 |
&47C0 7 =  |
 = 23 &4860 = 23 &4860 |
&4900 8 =  |
|
&4A40 9 =  |
|
&4B80 10 =  |
|
&4CC0 11 =  |
|
&4E00 12 =  |
|
&4F40 13 =  |
|
&5080 14 =  |
|
&51C0 15 =  |
That's the layout when the screen buffer is configured as a column buffer, so now let's look at the layout for the row buffer. This is rather simpler, and it looks like this:
The contents of the row buffer is in the shape of eight character rows of screen content. If we highlight the screen buffer, marking each of the eight rows separately, you can see where the buffer contents are in memory:
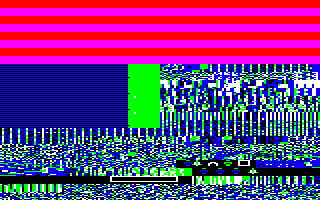
This image shows the screen buffer when it's configured as a row buffer for a downwards pan, which means the buffer contains a horizontal strip (or "row") of newly revealed landscape that gets scrolled into the bottom of the screen when the player is panning downwards. Again, this is all explained in the deep dive on panning and hardware scrolling, but you'll notice that the screen buffer is in one section, at the top of the screenshot above.
If we extract the contents of the row buffer, it looks like this:

If we split the screen buffer up into the separate rows, then the layout in memory looks like this (where 0 to 7 denote the individual buffers from screenBufferRow0 to screenBufferRow7):
&3F00 0 =  |
&4040 1 =  |
&4180 2 =  |
&42C0 3 =  |
&4400 4 =  |
&4540 5 =  |
&4680 6 =  |
&47C0 7 =  |
Now that we've seen the shape of the screen buffers in memory, let's talk a bit more about why they are built this way, and how the game uses them.
Mirroring the screen structure
------------------------------
There's a reason why the screenshots above contain clearly visible parts of the landscape, and that's because the screen buffer uses the exact same memory layout as screen memory. The Sentinel uses a custom screen mode that's based on the standard BBC Micro screen mode 5, but with only 25 character rows (see the deep dive on the custom screen mode for details). This means that each character row in screen memory takes up 320 bytes and is eight pixels high and 160 pixels wide, so consecutive character rows start every 320 bytes.
The screen buffer is laid out in exactly the same way (but with a small twist for the column buffer, which we'll come to in a moment). If we look again at the memory layout of the row buffer, we can see this:
| &3F00 0 = |
| &4040 1 = |
| &4180 2 = |
| &42C0 3 = |
| &4400 4 = |
| &4540 5 = |
| &4680 6 = |
| &47C0 7 = |
The first character row at screenBuffer0 is at &3F00 and takes up 320 bytes, and the second character row at screenBuffer1 is at &3F00 + 320 = &4040 and also takes up 320 bytes. This is the same layout as for screen mode 5, it's just that the first character row is at &3F00 instead of being in screen memory, and there are only eight character rows, with screenBuffer7 occupying memory from &47C0 to &48FF.
The row buffer is similar, but there is a twist. Here are the addresses again:
| &3F00 0 = |
= 16 &3FA0 |
| &4040 1 = |
= 17 &40E0 |
| &4180 2 = |
= 18 &4220 |
| &42C0 3 = |
= 19 &4360 |
| &4400 4 = |
= 20 &44A0 |
| &4540 5 = |
= 21 &45E0 |
| &4680 6 = |
= 22 &4720 |
| &47C0 7 = |
= 23 &4860 |
| &4900 8 = |
|
| &4A40 9 = |
|
| &4B80 10 = |
|
| &4CC0 11 = |
|
| &4E00 12 = |
|
| &4F40 13 = |
|
| &5080 14 = |
|
| &51C0 15 = |
The column buffer starts in the same way, with the first character row at screenBuffer0 being at &3F00, the second row at screenBuffer0 being 320 bytes later at &4040, all the way to screenBuffer15 at &3F00 + 15 * 320 = &51C0. But this is where things change, as instead of storing screenBuffer16 at &5300, we jump back to the start and store screenBuffer16 at &3FA0, and screenBuffer17 at &3FA0 + 320 = &40E0, and so on, until we reach screenBuffer23 at address &3FA0 + 7 * 320 = &4860.
The reason for this twist is a lack of spare memory. If the 24 individual rows in the column buffer were laid out consecutively, then the first eight buffers would still have to be big enough to cater for full character rows for when we need a row buffer, so that's 8 * 320 = 2560 bytes. The remaining 16 could be half-width buffers at 160 bytes each, so that's another 16 * 160 = 2560 bytes, giving a total of 5120 bytes.
If, however, the column buffers wrap around to reuse the second half of screenBuffer0 through screenBuffer7 instead (as the second half of these buffers isn't needed when the screen buffer only needs to buffer a column), then the total is 8 * 320 = 2560 plus 8 * 160 = 1280, giving a total of 3840 bytes and a saving of 1280 bytes. That's significant.
The trade-off is that the routines that access the screen buffer need to check whether they are accessing screenBuffer16 to screenBuffer23, and if they are, adjust the address accordingly. So when we move down to the next pixel line while drawing a polygon, for example, we need to check whether the high byte of the address is now &53 or greater, and if it is we know that we have gone past the end of the buffer and into the game code from &5300 onwards. So we update the screen address to point to screenBuffer16 and keep drawing into the buffers there instead; you can see this check in part 2 of DrawPolygonLines, for example.
There is one final aspect of the screen buffer layout that is elegant and efficient, and that's in the use of the spare space after the buffers at screenBuffer8 to screenBuffer15. Take a look at the layout of the column buffer in memory:
You can see that the non-buffer part of memory is absolutely crammed with data and code. In particular, the half-screen section in the middle-right of the screenshot is populated with a number of tables that fit exactly into the space left over by the buffer structure; each of the coloured buffer rows on the left is 160 bytes in size, and so are the rows of data on the right.
It turns out that the mess in the middle-right of the screenshot is where the object tables like objPointYaw and objPolygonData live, and these tables have been designed to be exactly 160 bytes each - not a byte more, not a byte less. This is because the number of points and the number of polygons in the game are both exactly 160, so the tables that contain one byte for each of these are exactly 160 bytes long... the perfect size to slot into the space next to the middle-eight column buffers.
This is by design, and it's a lovely example of Geoff Crammond squeezing in as much data as possible into the small memory footprint of the BBC Micro; see the deep dive on 3D object definitions for more details on the object tables.
Flipping between screen and buffer
----------------------------------
The screen buffers mirror the structure of screen memory for a number of reasons. One obvious advantage is that we can update the screen by simply copying data from the buffer into screen memory, without needing to change anything apart from making sure the address flips over to screenBuffer16 when required. But the other advantage is that the same drawing routines can be used to draw into the screen buffer and directly into screen memory; they just need to be configured properly.
The top-level switch that controls whether we draw into the screen buffer or screen memory is the screenOrBuffer variable. When this is zero, all the screen operations operate on screen memory, but when it is set to 25, everything operates on the screen buffer instead.
But why 25? The answer is in the lookup tables that are used to convert character row numbers into screen addresses. The tables at screenRowAddrHi and screenRowAddrLo contain a familiar sight for BBC Micro coders, with the X-th entry in each table containing the high and low bytes of the address of the start of character row X in screen memory.
The custom screen mode has 25 character rows, so the screenRowAddrHi and screenRowAddrLo tables are 25 bytes long. Following each of them in memory are two more tables: bufferRowAddrLo and bufferRowAddrHi, with the high byte tables following each other and the low byte tables doing the same. These follow-on tables contain the addresses of the 24 screen buffers, so the X-th entry in each table contains the high and low bytes of the address of the start of character row X in the screen buffer, as opposed to screen memory.
The landscape view is made up entirely of polygons, and when we draw the polygon lines that make up a polygon, the first thing we do in the DrawPolygonLines routine is to look up the address to which we should be poking these lines. So we do the usual conversion from pixel y-coordinate to character row by dividing the y-coordinate by 8 and using the lookup tables above to fetch the address of the character row in screen memory. And if we simply add screenOrBuffer to the index and then fetch the address from screenRowAddr(Hi Lo), then when screenOrBuffer is zero we fetch the address from screenRowAddr(Hi Lo), but when it's 25, we actually fetch the address from bufferRowAddr(Hi Lo), which is 25 bytes later in memory.
So screenOrBuffer controls whether we draw to the screen or to the screen buffer, using nothing more than a simple addition.
Configuring the screen buffers
------------------------------
The final aspect of the screen buffers is their configuration. We talked above about the screen buffer being either a row buffer or a column buffer, and we can configure the buffer to one of these types by calling either UseRowBuffer or UseColumnBuffer. These routines both call the ConfigureBuffer routine to set up the variables required to configure the screen buffer to the specified buffer type.
Calling UseRowBuffer or UseColumnBuffer will configure the type of buffer, but for the row buffer there are actually two types: the left row buffer and the right row buffer. These two types support the drawing of polygons in two parts, as described in the deep dive on drawing filled polygons; the details are in the linked article, but in summary, polygons are drawn in two stages for efficiency, with the first stage covering the left portion of each row in pixel bytes 0 to 255, and the second covering the right portion in pixel bytes 256 to 319.
This two-stage drawing process is supported by the two types of row buffer. When the relevant part of the polygon is drawn into the first 256 bytes in each row, the screen buffer is configured to use the left row buffer, and when the rest of the polygon is drawn into the last 64 bytes in each row, the screen buffer is configured to use the right row buffer. It's important to note that these are not two different buffers, they are simply two parts of the same row buffer that support the requirement of the DrawPolygon routine to be able to draw the polygon in two parts.
Configuring a buffer type essentially just sets a load of variables that control how the buffer is used. Here are all the variables that are set when we configure one of these buffer types:
| Variable | Source | Left row | Right row | Column |
|---|---|---|---|---|
| screenBufferType | Calculated | 0 | 1 | 2 |
| bufferMinYaw(Hi Lo) | buffersMinYaw | 20 | 20 | 8 |
| bufferMaxYawHi | Calculated | 138 | 138 | 132 |
| bufferMinPitch | bufferMinPitch | 176 | 176 | 48 |
| bufferMaxPitch | bufferMaxPitch | 240 | 240 | 240 |
| bufferOrigin(Hi Lo) | buffersOrigin | 10 | 2 | 12 |
| xBufferWidth | xBuffersWidth | 112 | 112 | 64 |
| xBufferLeft | xBuffersLeft | 80 | 64 | 96 |
| xBufferRight | Calculated | 192 | 176 | 160 |
These variables configure the buffer dimensions and bounds, so the landscape drawing process will only draw tiles and objects within the buffer, and the drawing output will be clipped to the correct buffer size. The values are either calculated or taken from the variables in the "source" column.
There are some other routines that are worth mentioning:
- The ConfigureObjBuffer routine configures the column buffer for the special case where we are updating an object onto the screen, for which we require the full half-screen width of each row in the column buffer. See the deep dive on dithering to the screen for some examples of this.
- The FlipBufferType routine flips the buffer type between buffer type 0 (left row buffer) and buffer type 1 (right row buffer), for use by the DrawPolygon routine.
- The SetColumnBufferMax routine sets the maximum and minimum pitch angles for the column buffer.
A quick note of caution, however: my analysis of the above variables is not exactly exhaustive, and I have no doubt there will be errors in my commentary. Finishing off this part of the project is on the to-do list, so bear this in mind if you venture into this part of the codebase...
Now that we've covered the structure of the screen buffers, the next step is to see them in-use, which you can read all about in the deep dives on panning and hardware scrolling and dithering to the screen.