How the drawing routines take a different perspective of the landscape view
If you want to understand how the landscape is drawn in the Sentinel, then you can make things a lot easier to follow if you just think about the landscape with an orientation like this:
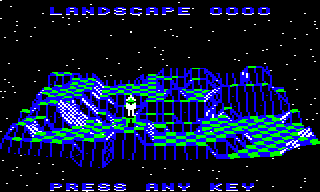
This is the landscape preview, and it makes the landscape layout nice and easy to talk about. There are tile rows that run from left to right and tile columns that run from front to back, and tile coordinates follow along in a sensible manner: the x-coordinates go from 0 to 31 when going along the x-axis from left to right, while the z-coordinates go from 0 to 31 when going along the z-axis from front to back. Meanwhile, the y-coordinates determine altitude, with higher altitudes being higher up the screen. It's all very logical, and you can find out more in the deep dive on Cartesian coordinates.
This model also makes it easier to talk about the landscape drawing routines. When drawing the landscape, we need to draw it from back to front, so that nearer parts of the landscape can correctly obscure the more distant parts. This is called the "painter's algorithm", because that's the order in which you would apply paint to a canvas to get the same effect, and when it comes to the landscape preview, we simply draw each tile row from z-coordinate 30 at the back to z-coordinate 0 at the front, and it all works nicely.
If we look at how the landscape preview is drawn behind the scenes, then we can see the painter's algorithm in action:
It's easy and it's logical, and that's why I've used this orientation of the landscape when trying to explain the drawing routines in the deep dive on drawing the landscape view.
But The Sentinel is a game of immersion and rotation, and during gameplay the player can rotate left and right through 360 degrees, so what does this mean for concepts such as the "back row" and "moving forwards"? In other words, what happens when the camera is looking in a different direction to our conveniently aligned example in the landscape preview?
The game addresses these concerns by splitting the full range of viewing angles into four quadrants, and then applying the correct quadrant to the drawing algorithm in a small number of key places. As mentioned above, I've kept all of this out of the main article on drawing the landscape view, and instead I've extracted all the complicated quadrant logic into this article.
So let's start by defining these quadrants, and then we can take a look at how they affect the drawing algorithm.
Calculating the quadrant
------------------------
The first step when drawing the landscape is to work out which direction the player is looking at, so we can use that to determine how we draw the player's view. Specifically, we want to draw the landscape from the back, starting from the furthest row of tiles and working towards the player, and to do that we need to work out which tiles in the landscape are the furthest from the player in the direction in which they are looking.
More specifically, we need to work out which quadrant the player is looking in. To explain quadrants, let's consider the Sentinel perched on its tower above the landscape, like this:
What does the view look like from up there, and how should we draw it? If the Sentinel is turned away from us in the above screenshot and is looking towards the back of the landscape, then the correct drawing order would be the same as in the video above - we should draw the rear tile row at z-coordinate 30 first as it's the furthest row of tiles, and then work forwards until we reach the Sentinel.
But if the Sentinel turns towards the right, then from its perspective, the furthest row of tiles is actually the rightmost tile column in the screenshot above, and to draw the landscape correctly we should start by drawing that column of tiles at x-coordinate 30, and work our way to the left, drawing tile columns until we reach the Sentinel. The same applies if the Sentinel is looking forwards (in which case we would start drawing from the front row of tiles) or looking to the left (in which case we would start drawing from the leftmost tile column).
The quadrant therefore defines which row or column of tiles we should be considering as the furthest line of tiles that need to appear at the back of the view we are going to draw. There are four choices, which in terms of the preview screen are the rear row, the rightmost column, the front row or the leftmost column of tiles.
When drawing a view, we calculate the quadrant from the viewer's yaw angle, which determines the direction in which they are looking (when drawing the in-game landscape view, the player is the viewing object, so we'll consider them as the viewer from now on, rather than The Sentinel). The calculation turns out to incredibly simple and efficient - the kind of calculation that makes you do a double-take when disassembling the code, as it seems almost too terse to be correct.
Specifically, we can calculate the quadrant by adding 32 to the player's yaw angle, and then taking bits 6 and 7 to give us a quadrant number in the range 0 to 3 that we can use to support landscape drawing from all angles. And that's the calculation in its entirety: one addition and two bits.
So what's going on here? Well, if we consider the orientation of the landscape preview, then the player's yaw angle determines the direction of gaze, like this:
          0
    -32   |   +32         Overhead view of landscape
       \  |  /
        \ | /             0 = looking towards back row
         \|/              +64 = looking sharp right
 -64 -----+----- +64      -64 = looking sharp left
         /|\
        / | \             ^           x-axis left -->
       /  |  \            |             to right
    -96   |   +96         z-axis
         128              into screen
So if the player has a yaw angle of 0, then they are looking directly towards the back row of the landscape in the preview, while a yaw angle of 32 means they are looking at the far-right corner of the preview; see the deep dive on pitch and yaw angles for more details.
As well as yaw angle, we can think of the viewing direction in terms of a clock or a compass, but I prefer the clock terminology here as it's easier to adapt to the player's perspective (we can talk about something being at 3 o'clock or 9 o'clock from the perspective of the player, but this doesn't work quite so well if we're talking about east and west).
To make this easier to describe, then, let's label the same diagram like a clock:
          12
  10.30   |    1.30
       \  |  /
        \ | /
         \|/
   9 -----+----- 3
         /|\
        / | \
       /  |  \
   7.30   |   4.30
          6
So if the player is looking at 12 o'clock, then they are looking towards the back row in the preview, while the far-right corner is at 1.30.
In terms of quadrants, the clock looks like this:
  10.30        1.30
       \     /
        \   /
         \ /
          +
         / \
        /   \
       /     \
   7.30       4.30
And to be more explicit, these are the four quadrant numbers, in a clockwise order from the top:
- Quadrant arc: 10.30 to 1.30
Centre of arc: 12 o'clock - Quadrant arc: 1.30 to 4.30
Centre of arc: 3 o'clock - Quadrant arc: 4.30 to 7.30
Centre of arc: 6 o'clock - Quadrant arc: 7.30 to 10.30
Centre of arc: 9 o'clock
To convert the player's yaw angle into a quadrant number, we start by taking the player's yaw angle and then add 45 degrees to it, storing the result in the viewingArcRightYaw variable. This rotates the quadrant diagram above into the more familiar clock quarters, like this:
          12
          |
          |
          |
          |
   9 -----+----- 3
          |
          |
          |
          |
          6
As there are 360 degrees in a circle and this angle is represented by a value of 256 in the code, 45 degrees is represented by 256 * 45 / 360 = 32, so in terms of code, we can perform this rotation by taking the player's yaw angle and adding 32 to it.
This rotation means that we can work out which quadrant contains the player's gaze by working out which clock quarter contains the rotated yaw angle in viewingArcRightYaw. And we can do this by simply looking at bits 6 and 7 of our new angle, because that's how the angles work:
                  0
  -64 to -1       |     0 to 63
  =  %11000000    |     =  %00000000
  to %11111111    |     to %00111111
                  |
         -64 -----+----- +64
                  |
  -128 to -65     |     64 to 127
  =  %10000000    |     =  %01000000
  to %10111111    |     to %01111111
                -128
We could rotate anticlockwise by 45 degrees to convert the clock quarter back into the relevant quadrant, so this means we get the following:
- viewingArcRightYaw has bit 6 = 0, bit 7 = 0, quadrant is 10.30 to 1.30
- viewingArcRightYaw has bit 6 = 1, bit 7 = 0, quadrant is 1.30 to 4.30
- viewingArcRightYaw has bit 6 = 0, bit 7 = 1, quadrant is 4.30 to 7.30
- viewingArcRightYaw has bit 6 = 1, bit 7 = 1, quadrant is 7.30 to 10.30
The values of bit 6 and 7 also give us a method of referring to each quadrant by a number from 0 to 3, as follows:
                %00 = 0


           10.30        1.30
                \     /
                 \   /
                  \ /
  %11 = 3          +         %01 = 1
                  / \
                 /   \
                /     \
            7.30       4.30


                %10 = 2
So the standard landscape preview shows the landscape being drawn when the viewer is looking at quadrant 0, between 10.30 and 1.30, towards the back of the landscape preview. Meanwhile quadrant 1 means the player is looking right in terms of the preview, quadrant 2 is looking forwards and quadrant 3 is looking left.
In other words, we can calculate the quadrant number by adding 32 to the player's yaw angle, and then taking bits 6 and 7 to give us a quadrant number in the range 0 to 3... which is the magic formula we've been trying to analyse.
If you're having trouble visualising all these rotations, then try this. Imagine a dog standing in the middle of the landscape, wearing one of those Elizabethan collars to stop her licking her wounds after visiting the vet (see this entry on Wikipedia if you don't know what I mean). Let's also say that the viewing arc for our poor injured pup is exactly 90 degrees from the left to the right side of her view.
If we take the angle in which the dog is looking - the dog's yaw angle - and add 45 degrees, then we get the yaw angle along the right edge of the dog's cone. This angle is what we stored in the viewingArcRightYaw variable above (hence the variable name).
Now consider our clock again:
          12
  10.30   |    1.30
       \  |  /
        \ | /
         \|/
   9 -----+----- 3
         /|\
        / | \
       /  |  \
   7.30   |   4.30
          6
Let's imagine our puppy scanning the landscape for her owner. First of all, she scans the top quadrant, looking between 10.30 and 1.30. When she's looking at 10.30, the right edge of the cone is pointing at 12 o'clock, and when she's looking at 1.30, the right edge is at 3 o'clock. So when viewingArcRightYaw is between 12 o'clock and 3 o'clock (i.e. when bits 6 and 7 are clear), the dog is looking in the top quadrant, between 10.30 and 1.30.
Similarly, when the dog is scanning between 1.30 and 4.30, the right edge points to anywhere between 3 o'clock and 6 o'clock, which is when bit 7 is clear and bit 6 is set. And if we repeat the process for all four quadrants, we get the result we are after:
- viewingArcRightYaw has bit 6 = 0, bit 7 = 0, quadrant is 10.30 to 1.30
- viewingArcRightYaw has bit 6 = 1, bit 7 = 0, quadrant is 1.30 to 4.30
- viewingArcRightYaw has bit 6 = 0, bit 7 = 1, quadrant is 4.30 to 7.30
- viewingArcRightYaw has bit 6 = 1, bit 7 = 1, quadrant is 7.30 to 10.30
This gives us the quadrant number in which the dog is looking, but without all those rotations. And now that we've got the quadrant, let's see what we can do with this information.
Using the quadrant
------------------
The landscape view is drawn by the DrawLandscapeView routine, and the first step is to calculate a set of variables that record the quadrant number in a number of ways. These variables then influence the algorithms that draw the landscape so that they work with all four orientations and with minimal changes.
In a broad sense, applying these variables changes the process so that instead of drawing the landscape in the orientation of the landscape preview, we draw the landscape in a quadrant-relative manner. For quadrant 0, these two things are the same, but for the other three quadrants, the quadrant-relative view (which we draw on-screen) has to think of the landscape layout in a different manner to the landscape preview.
We'll talk more about that in a moment, but first let's take a look at the quadrant variables and where they are used:
- viewingArcRightYaw is the variable we described above, which contains the player's yaw angle plus 45 degrees to give the right edge of the 90-degree viewing arc with the player's gaze at the centre.
It is used to convert tile coordinates between the standard layout (which is used by the landscape preview and tables like tileData), and the quadrant-relative layout (which is used to iterate through the landscape when drawing each line of tiles). For the conversion from the standard model to the quadrant-relative model, see part 1 of DrawLandscapeView (and see below for an explanation); for the conversion from quadrant-relative coordinates back to standard coordinates, see part 2 of GetTileViewAngles. - quadrantOffset is set to the offset that we need to add to a point index within the drawing tables if we want to move by one corner in the direction of the quadrant's gaze.
It is used in DrawTileAndObjects when fetching angles from the drawing tables for the tile that we are drawing. - viewingQuadrantx4 is set to the quadrant number but multiplied by 4, for use when calculating the number of faces in a sloping tile.
It is used in DrawSlopingTile to choose shape numbers that are relative to the viewer's orientation. - viewingQuadrantOpp is set to the opposite quadrant number to that containing the player's gaze.
It is used in DrawSlopingTile to set the correct tile shape colour according to the orientation, and DrawTileAndObjects to set the correct starting point number for the triangles when drawing tile shape 4 or 12. - screenLeftYawHi is set to the yaw angle of the gaze in the centre of the viewing arc, less 14.0625 degrees (i.e. 360 * 10 / 256). The screen is 20 yaw angle units across, so this sets screenLeftYawHi to the high byte of the yaw angle of the left edge of the screen, reduced into the range of a single 90-degree quadrant (so it's relative to the 90-degree viewing arc).
It is used in part 1 of GetTileViewAngles to convert a tile corner's yaw angle into a relative yaw angle from the left edge of the screen.
Don't worry if these don't all make sense - I'm not sure I fully understand them all, so my explanations are probably not helping! But the main takeaway is that there's a bunch of variables that capture the direction of the player's gaze, and these are used by the drawing routines to implement the correct drawing of views in different quadrants. In a sense, when they are applied to the drawing routines, these variables effectively rotate the landscape through the correct multiple of 90 degrees such that we always draw the landscape from the back row to the front row; they just do it without having to do any actual rotating.
To see what I mean, take the landscape preview and imagine putting it on one of those rotating cake stands:
Now let's consider how we would draw it from the point of view of the player in various rotations:
- If the player is looking at the 10.30 to 1.30 quadrant, then we draw the landscape from the back row to the front row, just like in the video clip above.
- If the player is looking at the 1.30 to 4.30 quadrant, i.e. to the right in the above screenshot, then we can turn the landscape in the preview anticlockwise by 90 degrees so that the rightmost tile column moves around to become the row of tiles at the back. This also rotates the player so they are looking away from us, so then we can draw the landscape from the furthest line of tiles to the nearest, which will actually draw the landscape by column from x-coordinate 30 (on the right in the above screenshot) to x-coordinate 0 (on the left in the above screenshot).
- If the player is looking at the 4.30 to 7.30 quadrant, i.e. straight into the camera in the above screenshot, then we can turn the landscape in the preview by 180 degrees so that the front row moves to the back. This also rotates the player so they are looking away from us, so then we can draw the landscape from the furthest line of tiles to the nearest, which will actually draw the landscape by row from z-coordinate 0 (in the front in the above screenshot) to z-coordinate 31 (at the back in the above screenshot).
- And finally, if the player is looking at the 7.30 to 10.30 quadrant, i.e. to the left in the above screenshot, then we can turn the landscape in the preview clockwise by 90 degrees so that the leftmost tile column moves to the back. This also rotates the player so they are looking away from us, so then we can draw the landscape from the furthest line of tiles to the nearest, which will actually draw the landscape by column from x-coordinate 0 (on the left in the above screenshot) to x-coordinate 30 (on the right in the above screenshot).
A good example of this "turning" of the landscape can be found in the conversion between standard and quadrant-relative tile coordinates, which is powered by the viewingArcRightYaw variable. We do this conversion in part 1 of DrawLandscapeView, where we work out the tile coordinates of the player, but within the rotated landscape that we're going to be working with. If we don't need to rotate the landscape via our quadrant variables (when the player is looking between 10.30 and 1.30), then the player's tile coordinate is fine as it is. But if we are going to be drawing the landscape in a different direction, we need to convert the player's tile coordinates as follows:
- If the viewer has not turned: (x, z) maps to (x, z)
- If the viewer has turned right: (x, z) maps to (30 - z, x)
- If the viewer has turned around: (x, z) maps to (30 - x, 30 - z)
- If the viewer has turned left: (x, z) maps to (z, 30 - x)
Let's take the second example, where the viewer is looking to the right, into the quadrant from 1.30 to 4.30. If you imagine the standard 3D world, with the z-axis going into the screen and the x-axis going from left to right, then turning right means that from our new perspective:
- The axis we now see running from left to right is the 3D world z-axis, but in the opposite direction.
- The axis we now see going away from us is the 3D world x-axis.
Therefore, from the perspective of the viewer:
- The x-axis for the viewer is the 3D world z-axis in the opposite direction, which is 30 - z.
- The z-axis for the viewer is the 3D world x-axis, which is x.
So that's what we calculate for the player's tile coordinate relative to the orientation, putting the resulting coordinate into the variables xTileViewer and zTileViewer for use in the drawing routines. We use a similar calculation for the other two quadrants, as shown above.
Throughout the drawing routines, the assumption is that we have set up all these variables so that the landscape is effectively turned around to the correct orientation to be drawing the row at the back and moving forwards, even if, in the original landscape, that row is a column. Sometimes this can give us a challenge, as in part 2 of GetTileViewAngles, where we have a quadrant-relative tile coordinate for which we need to fetch the tile data. The tileData table stores tiles in the same way as the landscape preview, so before we can fetch the data we need to convert the quadrant-relative tile coordinate into a coordinate that is suitable for looking up tile data; the calculation is effectively the reverse of the one we just examined. But for most of the drawing process, we can just imagine that we are drawing distant rows first and moving forwards, even if that isn't strictly true.
This can be pretty mind-bending stuff, but hopefully extracting all this away from the deep dive on drawing the landscape view makes the latter a little easier to follow...